

Three contractors price the same bathroom. One texts a number. One hands over a carbon copy. One sends a page with line items, dates and a spot to sign. That’s the one that looks like it’ll show up. It doesn’t have to be the cheapest. This free contractor estimate template gets you that page, and the Excel version builds your overhead and profit into the price for you.
The short answer: a good contractor estimate template has your company and license info, the customer and job address, an estimate number and a valid-until date. It has a plain-English scope, priced line items, allowances and exclusions. It ends with start and finish dates, a deposit and payment schedule, a change order rule and two signatures. To price it, take the full job cost (labor, materials, subs and overhead) and divide by one minus the margin you want.
Key takeaways
- The Excel version does the labor, materials with waste, overhead, profit and deposit math for you. Get the files
- The FTC says a written estimate should list the work, materials, completion date and price. Our list has 12 lines. What to include
- Estimates, quotes, bids and proposals differ in how firm the price is and when you use each one. Which document
- Price equals full job cost divided by one minus your margin, so a 20% margin needs a 25% markup. Pricing math
- In our bathroom example, adding 20% to direct cost alone leaves you $3 in the hole. Worked example
- Roofs are priced by the square (100 sq ft), and rotted decking belongs on a per-sheet line, not in a guess. Roofing version
- California caps home improvement deposits at $1,000 or 10% of the price, whichever is less. Signing rules
- Homeowners are told to get three written estimates, so send yours fast and follow up on day 2 and day 7. Follow-up texts
Download the free contractor estimate template
Pick the one you’ll actually use. The Excel version does the math for you: labor, materials with waste, overhead, profit and the deposit. The Word and PDF versions are for printing or typing in. And there’s a roofing version priced by the square.
Here’s what’s in the pack:
- Excel workbook (3 tabs). Tab 1 is your private pricing sheet. Tab 2 is the estimate the customer sees, and its line items fill in from tab 1. Tab 3 is a roofing worksheet. Light orange cells on tabs 1 and 3 are your pricing inputs. On tab 2, fill in the top lines, write the scope, and swap in your own allowances, exclusions and payment schedule at the bottom.
- Word estimate form. Same layout as the customer tab, with a spot for your logo, line items, allowances, exclusions, payment schedule and signature lines. Our credit line and logo sit at the bottom. Delete them before you send it.
- PDF estimate form. A print-and-write form for the tailgate. To type in it, use the Word version.
- Roofing estimate form in Word and PDF, with roof area, squares, layers and a decking line built in.
- A filled-in example so you can see what a finished one looks like.
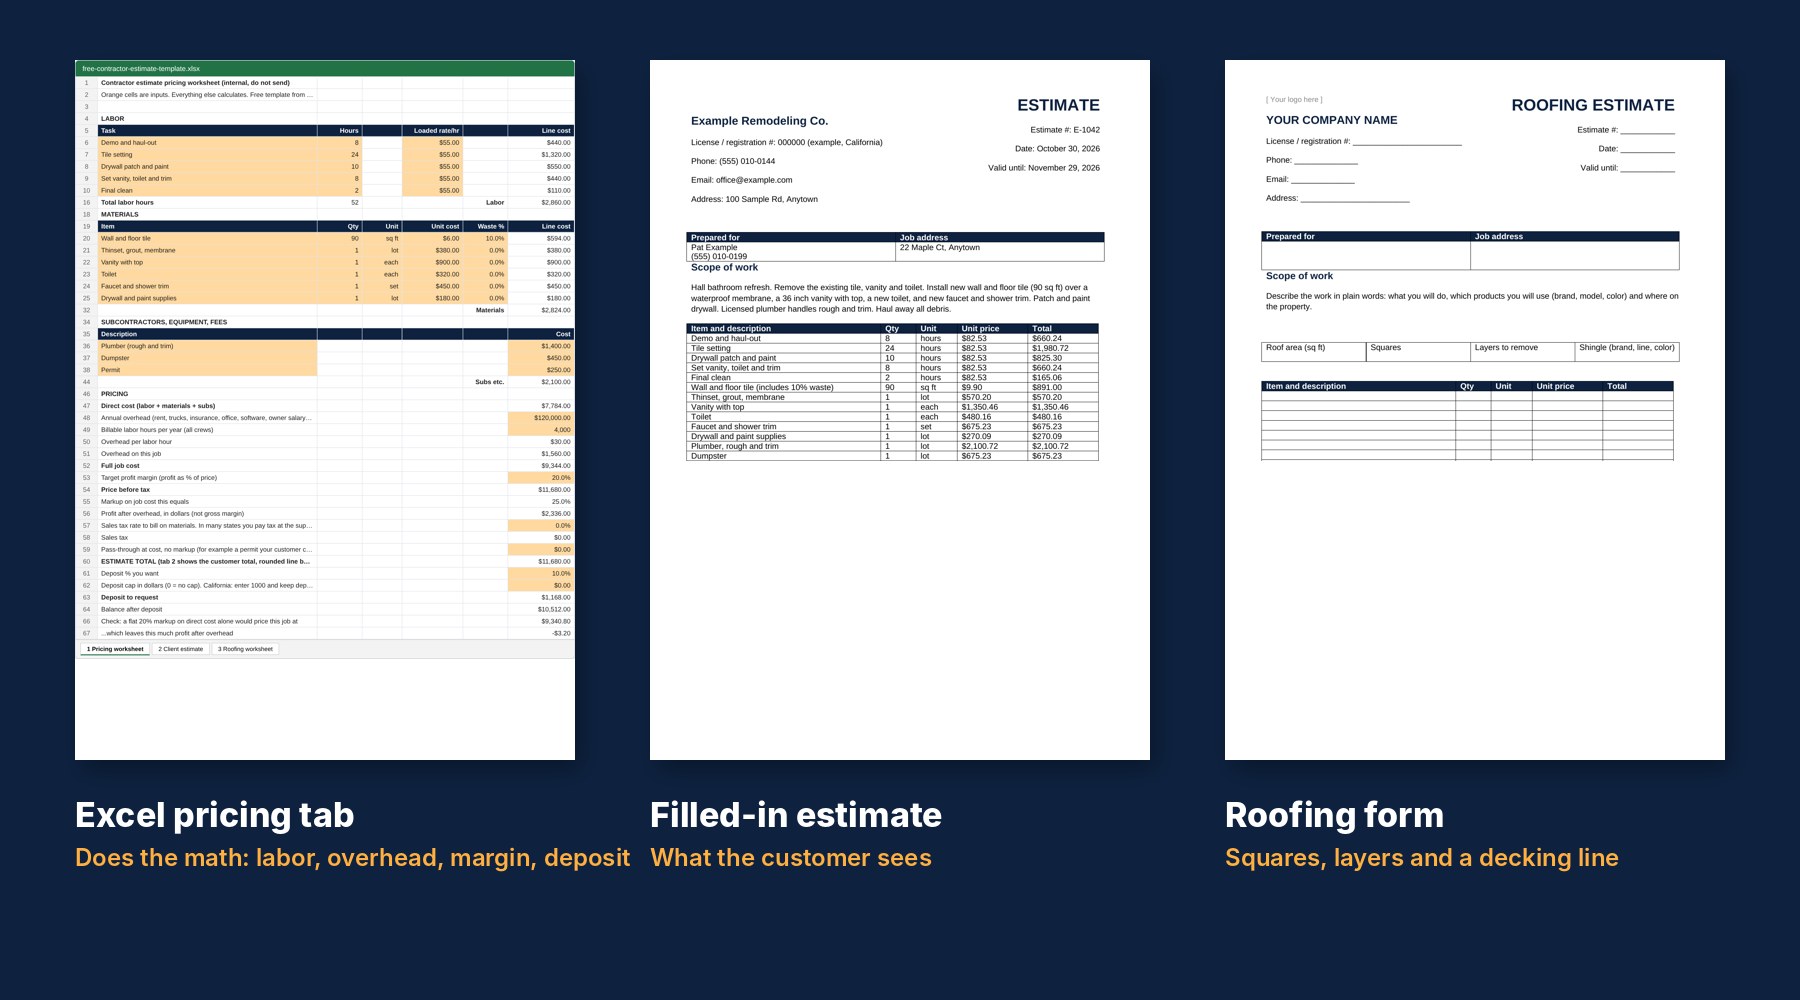
Which one should you use? If you price more than a couple of jobs a week, use Excel. You’ll stop doing math on your phone in the driveway, and the customer copy comes out clean. Use the PDF if you write estimates by hand and want something that looks better than a carbon pad. The files open in Excel, Google Sheets, Word, Google Docs and LibreOffice. No sign-up, no email gate.
Don’t email the Excel file itself. Tab 1 has your costs and margin. Save tab 2 as a PDF and send that. When the job’s done, copy the line items into our free contractor invoice template. It uses a similar layout, so it’s a quick copy and paste.
What a contractor estimate template should include
The FTC tells homeowners what a written estimate should have: “a description of the work to be done, materials, completion date, and the price.” That’s the floor. Here’s what we’d put on every estimate, and why.
- Your company block. Name, phone, email, address and your license or registration number. Some states require that number on the contract, so put it on the estimate from day one.
- Customer and job address. The job address isn’t always the billing address. Rentals and flips trip people up here.
- Estimate number and date. Use a simple run like E-1001, E-1002. When the customer calls in three weeks, you’ll find it in seconds.
- Valid-until date. We’d start with 30 days. Material prices move, and an open-ended price is a promise you can’t keep.
- Scope of work in plain words. What you’ll do, where, and with which products (brand, model, color).
- Line items. Quantity, unit, unit price and total for each part of the job, plus sales tax if your state taxes it. Tax rules on contractor materials vary by state, so ask your accountant. The sheet figures tax on your material cost. If your state taxes the selling price, change it.
- Allowances. If the customer still has to pick the tile or the fixtures, say how much you included. Also say how an upgrade gets billed. We’d charge the difference plus your usual markup, and say so on the estimate.
- Not included. Hidden rot, mold, code upgrades, moving a drain. Write down what the price doesn’t cover.
- Start and completion dates. Estimated is fine. Blank isn’t.
- Deposit and payment schedule. Tie each payment to a stage of work, not to a calendar date.
- Change order line. Changes get priced in writing and signed before the extra work starts.
- Signature lines. One for the customer, one for you, both dated.
Twelve lines sounds like a lot for a $900 repair. Most take ten seconds. The customer will look hardest at the scope, the total and the dates. The rest is there for the day something goes sideways.
One thing we’d leave off the customer copy: your overhead and profit math. That lives on the private tab. The customer sees line prices and a total, not your margin.
Estimate, quote, bid or proposal: which are you sending?
Contractors use these four words loosely. You’ll care about the difference the day a customer says “but you said.” There are no legal definitions that hold in every state, so here’s how most contractors use them.
| Document | What it is | Is the price firm? | When to use it |
|---|---|---|---|
| Estimate | Your price for the scope you can see | It holds for what’s listed. Allowances and hidden conditions can move it, and you say how up front | Most residential jobs, repairs and replacements |
| Quote | A fixed price for a clear, small scope | Yes, until the valid-until date | Service work, a water heater swap, a panel upgrade |
| Bid | Your price in answer to someone else’s plans and specs | Yes, for the plans as drawn | GC or owner sends out drawings and compares numbers |
| Proposal | An estimate plus the pitch: options, photos, why you | Same as the estimate inside it | Bigger remodels, roofs, additions, anything over a few thousand |
Our take: for most home service jobs, send an estimate with firm line prices and clear allowances. Wishy-washy ranges (“$8,000 to $14,000”) make you look unsure. They also start a haggle at the low number.
The template works for all four. For a bid, keep the line items in the same order as the plans so the GC can compare you side by side. For a proposal, add a page of job photos and two or three options in front of it. Good, better, best works well here. In Excel, save one copy of the workbook per option, like Good.xlsx, Better.xlsx and Best.xlsx. We show a good, better, best tier layout in our HVAC service agreement template.
How to price a job on your estimate: labor, materials, overhead and markup
An estimate can have the labor and materials priced right and still lose money. That happens when overhead never made it onto the page, or when markup got mixed up with margin. Here’s the math in four steps. The Excel template does all of it, but you should know what it’s doing.
Step 1: Labor hours times a loaded rate
Count the hours for each task, then multiply by a loaded rate. That’s the wage plus what it costs you to have that person on the clock: payroll taxes, workers’ comp, benefits and paid time off.
Your accountant can figure this from last year’s payroll. Example calculation: a $40 wage plus $15 an hour of taxes, comp, benefits and paid time off is a $55 loaded rate. If you only use the bare wage, you’re short on every hour. If you work in the field yourself, count your hours here. Pay for your office time goes in overhead.
Step 2: Materials plus waste
Quantity times your cost, plus a waste percent for anything you cut. Tile, flooring, trim and shingles all need it. In our example we use 10% for tile. Set your own by trade and by job, because a room full of angles wastes more than a square one.
Step 3: Overhead per labor hour
Overhead is everything you pay for that isn’t tied to one job: the shop, trucks, insurance, phones, software, the office person and marketing. Add up a year of it. Divide by the labor hours your crews bill in a year. Say that’s $120,000 over 4,000 hours. That’s $30 an hour, and it goes on every job by the hour. Brand new and no history yet? Use this year’s budget and a careful guess at hours, then fix it after six months of real jobs.
Step 4: Price for margin, not markup
Markup is what you add on top of cost. Margin is the share of the final price you keep. They’re not the same number. Add 20% to a $10,000 cost and you charge $12,000, but you only keep $2,000 of it. That’s a 16.7% margin, not 20%.
So decide the margin you want first. Then price it like this: price = full job cost divided by (1 minus your margin). For a 20% margin on a $10,000 cost, that’s $10,000 divided by 0.8, or $12,500. This margin is your profit after overhead, not gross margin, so don’t compare it to a gross margin number someone quoted you.
| Margin you want | Markup you need on cost | Price on a $10,000 job cost |
|---|---|---|
| 10% | 11.1% | $11,111 |
| 15% | 17.6% | $11,765 |
| 20% | 25.0% | $12,500 |
| 25% | 33.3% | $13,333 |
| 30% | 42.9% | $14,286 |

What margin should you aim for? It depends on your trade, your market and how much overhead you carry, so we won’t hand you one number. Run last year’s jobs through the worksheet and see what you actually kept. That’s your real starting point.
A filled-in construction estimate example
Here’s a hall bathroom refresh run through the template, start to finish. Every number below is an example calculation, not a price list. Your labor rate, your supplier and your overhead will be different, so swap in your own.
The job: tear out the old tile, vanity and toilet. Put in 90 square feet of new tile over a waterproof membrane, plus a new vanity, toilet and shower trim. A licensed plumber handles rough and trim. Patch and paint, haul it all away.
| Line | How it’s figured | Amount |
|---|---|---|
| Labor | 52 hours at a $55 loaded rate | $2,860 |
| Materials | Tile 90 sq ft at $6 plus 10% waste ($594), setting materials $380, vanity $900, toilet $320, trim $450, paint supplies $180 | $2,824 |
| Subs and fees | Plumber $1,400, dumpster $450, permit $250 | $2,100 |
| Direct cost | Labor + materials + subs | $7,784 |
| Overhead | 52 hours at $30 per hour | $1,560 |
| Full job cost | Direct cost + overhead | $9,344 |
| Price | $9,344 divided by 0.8 for a 20% margin | $11,680 |
| Profit | Price minus full job cost (a 25% markup) | $2,336 |
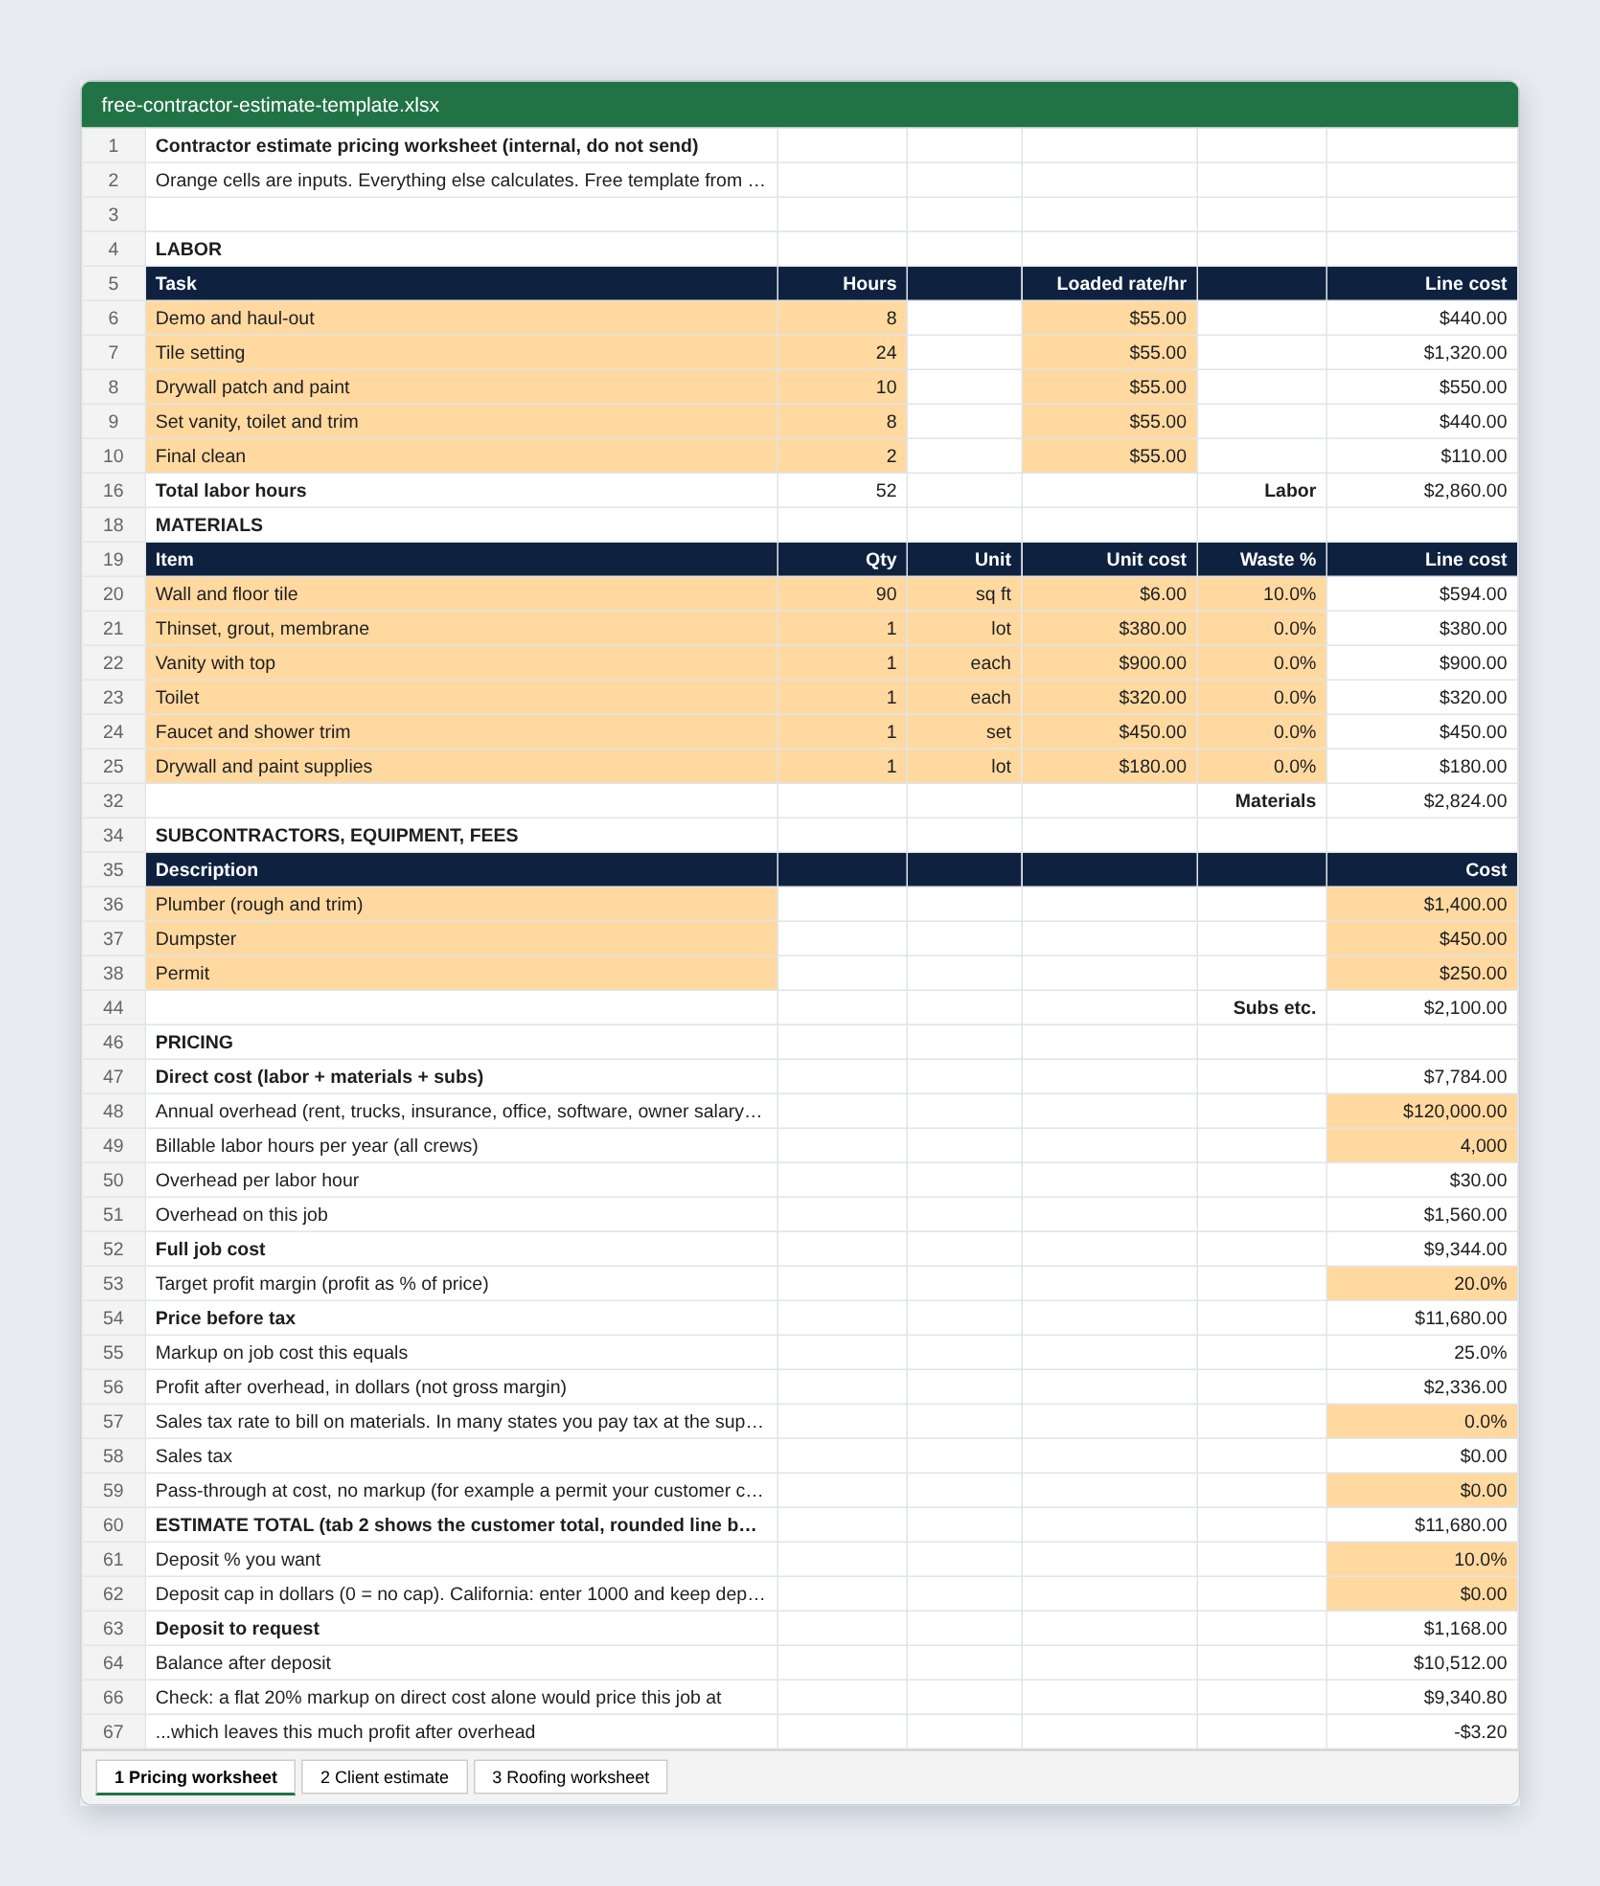
Now look at what happens if you skip overhead and just add 20% to the direct cost. You’d price it at $9,341. The full job cost is $9,344. You’d do the whole bathroom for $3 less than it cost you, and you wouldn’t know until the end of the year.
Your crew gets paid and the plumber gets paid. You don’t. You’d run the whole job for minus $3.
On the customer copy, the template spreads overhead and profit across the lines. So the customer sees tile setting at $1,980.72 and the vanity at $1,350.46, not your $55 rate and $900 cost.
They do see hours and a billed rate. If you’d rather not show hours, type 1 over the hours and “lot” over the unit on each labor line.
One more catch: spreading puts markup on the permit line too. If your customers can see the permit fee, take it off the subs list and put it in the pass-through cell on tab 1. It skips the markup and shows on its own line. Each customer line is rounded to the cent, so the customer total in this example is $11,679.78.
One note on the deposit: the example PDF uses $1,000, the California cap. With the sheet’s defaults (10%, no cap) you’ll see $1,167.98. Enter 1000 in the cap cell and it matches. And if you’re wondering why tile shows $9.90 a foot on a $6 allowance: the $6 is the tile’s cost, and the $9.90 line includes waste, overhead and profit. You can see the finished example as a PDF.
The roofing estimate template version
Roofing gets its own tab because roofs are priced by the square, not by the hour. One square is 10 by 10 feet, or 100 square feet of roof. Shingles, tear-off, labor and overhead all start from that number. The accessory lines are amounts you type in from your own takeoff.

Here’s how the roofing tab works, in the order you’d fill it in:
- Roof area. Type the total square feet from your measuring app or report. The sheet divides by 100 to get squares.
- Waste. Set it per roof. A simple gable wastes less than a roof full of hips, valleys and dormers. Our example uses 12%. The sheet rounds up to whole squares to order.
- Bundles. Many GAF shingles take about 3 bundles per square. Check the wrapper on the line you use, then change the number if needed.
- Accessories. Underlayment, ice and water shield, drip edge, starter, hip and ridge cap, plus a lot line for nails, vents, boots and flashing.
- Tear-off. Price per square, per layer. Two layers mean more tear-off labor, so layers get their own input. Bump the dumpster line too.
- Overhead per square. Your yearly overhead divided by the squares you install in a year.
Example calculation: a 2,400 square foot roof is 24 squares. Add 12% waste and you order 27 squares, or 81 bundles. With the example material prices, tear-off, labor, a dumpster and a permit, the direct cost comes to $10,610. Add $40 a square of overhead and the full job cost is $11,570. At a 25% margin, the price is about $15,427. That’s roughly $643 a square.
Labor and tear-off use the 24 squares on the roof, while materials use the 27 you order. Tab 3 gives you the roof price. Put it on the roofing Word form as one line, or show each line at your price by multiplying its cost by the customer line multiplier on tab 3. That’s about 1.45 in our example ($15,427 divided by $10,610).
The decking line that saves arguments
You can’t see rotted decking until the shingles come off. So don’t guess it into the price. Put this on the estimate instead: “Rotted decking is not included. If we find it after tear-off, we photo it, show you, and replace it at $95 per sheet.” Use your own price per sheet. The homeowner knows the rule before you start, and your crew isn’t stuck on the roof waiting on a phone call.
When three roofers walk the same house, the one who writes down squares, layers and a decking price looks like the one who’s done this before. If you want more roofs to bid on in the first place, here’s how we approach roofing marketing.
Terms that protect you when the estimate gets signed
Once the customer signs, your estimate can turn into a contract. So your state’s rules decide what has to be on it before they sign. The FTC says it right on its home improvement page: “Contract requirements vary by state.” Here are two state rules and one federal one, so you can see how much they differ.
| Rule | What it says | What to put on your template |
|---|---|---|
| California deposit cap | The down payment can’t be more than $1,000 or 10% of the contract price, whichever is less, on a home improvement job. CSLB says a written contract is required for home improvement projects over $500. | In California, keep the deposit at 10% and enter $1,000 in the deposit cap cell. The sheet asks for whichever is less. CSLB also says there are no exceptions for special-order materials, and the contract has to show the down payment rule in at least 12-point bold type. Add that line to your Word form. |
| Connecticut contract rules | Under Sec. 20-429, a home improvement contract isn’t enforceable against the owner unless, among other things, it’s in writing, signed by both, dated, and shows your name, address and registration number, a cancellation notice, and start and completion dates. | Fill in the registration line, both dates and the cancellation notice before anyone signs. |
| FTC 3 day Cooling-Off Rule | Gives buyers until midnight of the third business day to cancel certain sales made at their home. That includes a sales presentation the homeowner invited you to give. It doesn’t cover home sales under $25. It also doesn’t cover a repair or maintenance call the homeowner asked you to come do on their personal property, but anything extra you sell on that visit is covered. Read the full list before you count on an exception. | If you sell at the kitchen table, read the rule itself, 16 CFR Part 429, and add the cancellation notice and forms it requires. |
Both California and Connecticut also want changes in writing. CSLB says a change to price or scope must be made with a written change order “signed by the customer and contractor prior to the change.” That’s why the template has a change order line. Even in states that don’t require it, it’s how you get paid for the extra outlet the customer asked for on day three.
The rest of the terms cover the stuff that starts fights:
- Valid-until date so a six-month-old price doesn’t come back to bite you.
- Hidden conditions: you stop, show photos and price the fix in writing before going on.
- Who pulls permits, so nobody assumes.
- Payments tied to finished stages, not dates. CSLB also says payments can’t get ahead of the work done, except the down payment.
We’re a marketing agency, not a law firm. The template is a starting point, not legal advice. Not in California or Connecticut? Your state’s contractor licensing board or consumer protection office is the place to look. Then have your attorney look the template over once before you use it on real jobs.
Mistakes we see on contractor estimates
- One line, one number. “Bathroom remodel: $11,680.” The customer has nothing to compare, so they compare the total and pick the lowest one.
- No overhead. We showed the $3 bathroom above. It’s the first thing we’d check.
- No exclusions. If rot or mold isn’t written down as extra, the customer assumes it’s included.
- No expiration date. A customer calls back in spring wanting last fall’s price.
- Trade words with no plain-English version. “R&R ridge, I&W at eaves” means nothing to a homeowner. Write “remove and replace ridge cap” and “ice and water shield along the bottom edge of the roof.”
- Sent from a personal Gmail with no logo. It works. It also looks like the outfit that might not show up.
- Slow to send. A week to get a number back is a week the other contractors had the customer to themselves.
Fix them once in the template and you’re done.
Send it fast, then follow up like you want the job
The FTC tells homeowners to “Get three written estimates.” Another FTC page tells them not to automatically choose the lowest bidder, and to ask why if the prices are far apart. So your estimate is sitting next to two others. Plenty of contractors send the number and wait. Two short texts, on day 2 and day 7, put you ahead of them.
The day 2 text works because it points at what a cheaper bid may have left out.
Here’s the follow-up we’d set up for any trade. Copy it, change the names and save it as text shortcuts on your phone.
Same day: send it
“Hi Pat, it’s Sam from Example Remodeling. Your bathroom estimate is attached. The total is $11,679.78 and it’s good through [date, 30 days out]. The only open item is your tile pick. The price covers tile up to $6 a square foot. If you pick something pricier, I’ll send a change order for the difference plus our usual markup before we order it. Any questions, text me here.”
Day 2: answer the question they haven’t asked
“Hi Pat, quick note on the estimate. If you’re comparing prices, check that everyone included the waterproof membrane behind the tile and a licensed plumber. Those are easy to leave out of a lower price. Happy to walk you through ours.”
Day 7: make it easy to say yes or no
“Hi Pat, I’ve got an opening the week of [date] and wanted to see if you’d like it. If you went another way, no hard feelings. A quick ‘no thanks’ helps me plan the schedule.”
A fast “no” beats a maybe that sits on your calendar for a month.
Make the estimate do some selling
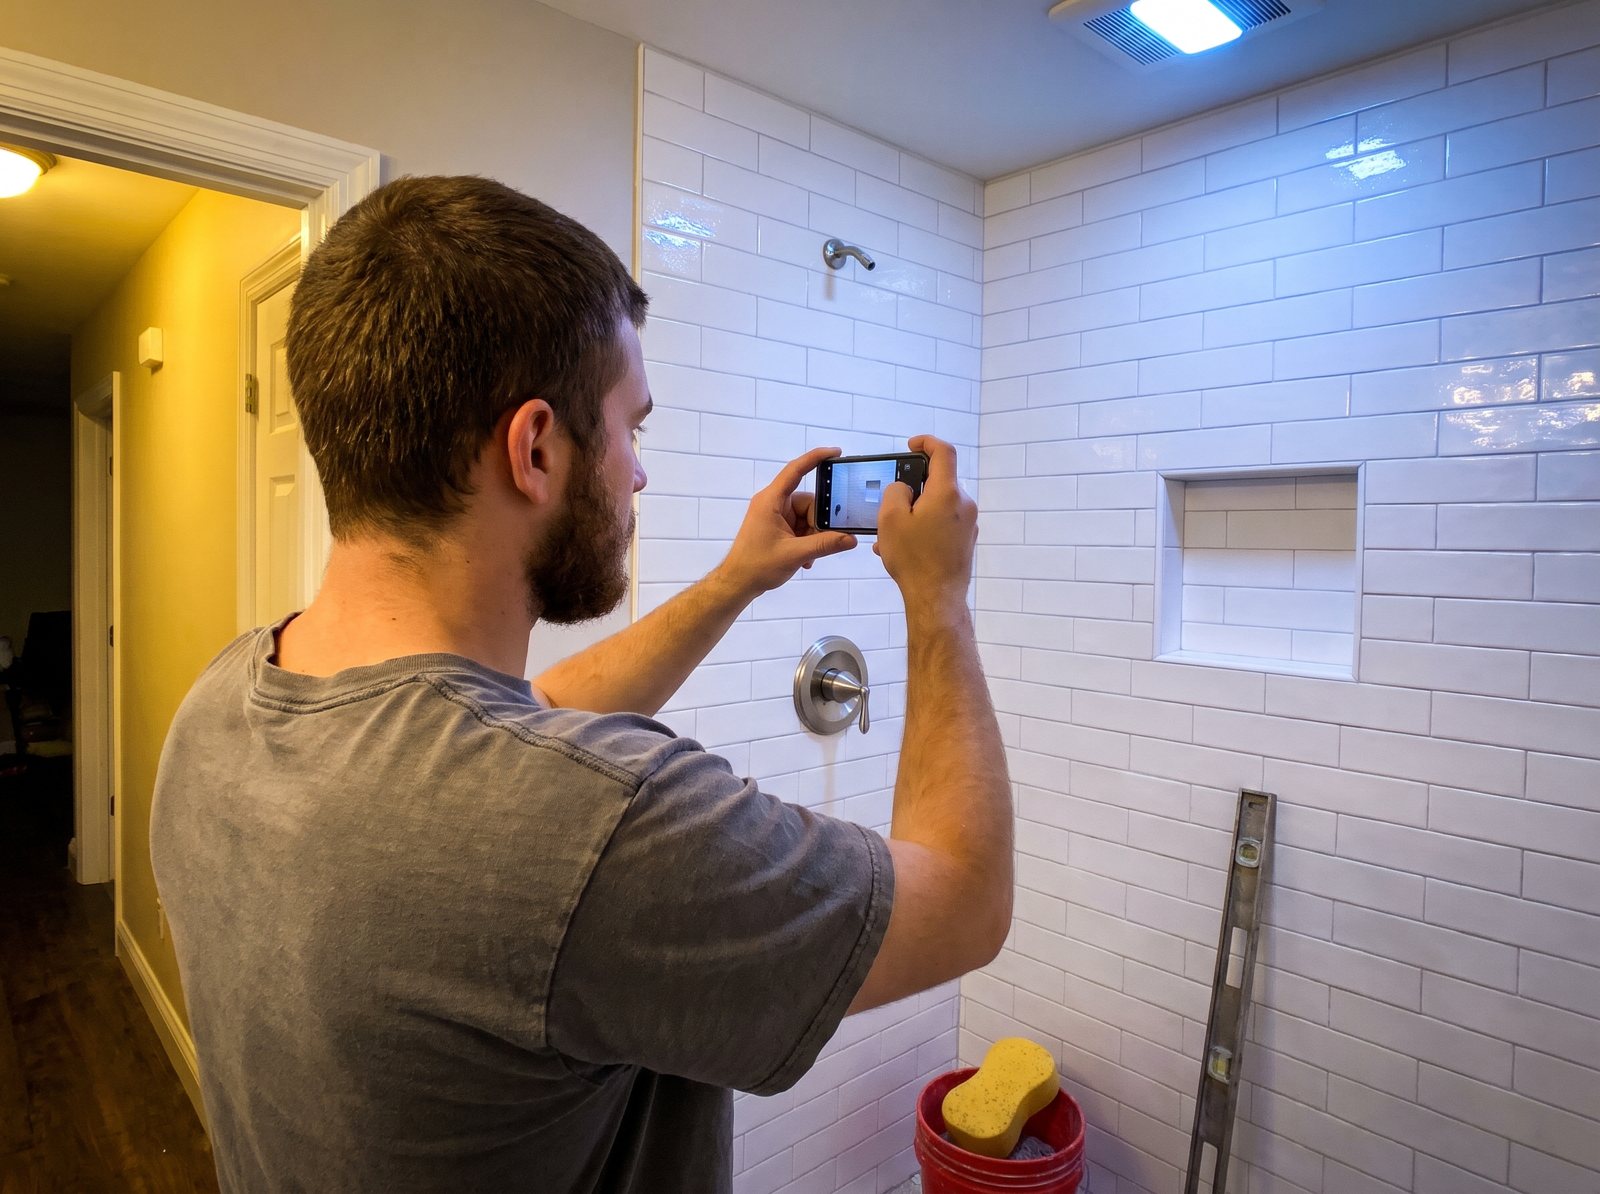
- Attach two or three photos of a similar job you finished.
- Add a short line under your logo with your review count and a Google review link, so they can read what past customers said.
- Link to your project gallery. If your site doesn’t have one, here’s what we put on a website that sells before you show up.
- Write down where each lead came from. After a few months you’ll see which sources close. Here’s more on where your leads come from.
Contractor estimate FAQ
Should I charge for an estimate?
For most repair and replacement jobs, we think free estimates are the norm, and charging can cost you the lead. For big design work, like a full kitchen with drawings, a paid design fee makes sense. If you charge one, say so before the visit and credit it toward the job if they hire you.
How much over an estimate can a contractor go?
There’s no single national percent. What matters is what you both signed. If the work stays inside the written scope, the price should hold. Extra work or hidden damage should be priced in a written change order the customer signs first. California requires that for home improvement jobs, and Connecticut requires changes in writing signed by both sides.
What is O&P on a construction estimate?
O&P means overhead and profit. It’s the part of the price that pays for running your business and the part you keep. On insurance claim estimates written in Xactimate, it’s a percentage that may be added on top for the general contractor. On a retail estimate, we’d build it into the line prices instead, which is what our template does on the customer copy.
How long should an estimate be valid?
We’d start at 30 days for most jobs. Go shorter when material prices are moving fast, and longer for a customer who is waiting on financing or an insurance check. Whatever you pick, print the date on the estimate. After that date, you can keep the price or re-price the job. Your call.
Is a signed estimate a contract?
It can be, once both sides sign and it lays out the work and the price. But some states spell out what a home improvement contract must contain before it can be enforced. Connecticut’s list includes your registration number, a cancellation notice and start and completion dates. Check your state’s rules and have an attorney review your form.
What to do this week
Start here:
- Download the Excel template and put your logo, license number and terms in it.
- Add up last year’s overhead and billable hours. Put both numbers in tab 1.
- Run your last three jobs through the worksheet. See what margin you really made.
- Save the three follow-up texts as phone shortcuts.
- Look up your state’s home improvement contract rules and add any required notices.
A sharp estimate wins more of the leads you already get. Want more people asking for estimates? Start with a free look at how you show up on Google.


